


The developer of RegCleaner, jv16 PowerTools, Uninstalr, WinFindr, Startup Timer, ScreenshotX, System Examiner and Windows Update Fixer.
Understanding the DNS Server Not Responding Errors
DNS or Domain Name System is a server that translates website addresses (language which computers can understand) so that your browser can connect to them. DNS allows you to browse a website online simply by typing the domain name instead of the IP address. Put simply, the DNS server is the phonebook of the Internet.
When you connect a device to your home network or a Wi-Fi hotspot with internet access, the internet connection may fail to work for a lot of several reasons.
In this article we will talk about a particular category of reasons, which is DNS errors. Windows 7, Windows 8.1 and Windows 10 computers may report the following error messages in the Troubleshooting Problems found window:
“DNS server not responding”
It may also show up with the websites name along with the message ‘Server DNS Address could not be found.’
The DNS server not responding error on Windows is one of the most common issues. If you get this error on your Windows PC, the device will not be able to reach the internet.
Your PC might appear to be correctly configured, but the device or resource (DNS server) is not responding.
The DNS Server not responding error occurs when one portion of a network is not connecting properly to another portion of the network (your device). DNS errors are one of the most common errors users receive while surfing the Web.
This can occur because of a wide range of issues which we’ll tackle in this article.
One of the most common problems associated with a DNS error is a down network. A single server in the system may not relay the information correctly to the next server. Or a setting may be wrong, or something as simple as a cord connected incorrectly to an added server.
Let’s try narrowing the range of issues:
Connect to a different device
First, try to connect a different device like a tablet or someone else’s laptop, either using Wi-Fi or a wired computer network (Ethernet). If you can connect a phone, tablet, or PC to the network and access the webpage that you’re having trouble with on your primary device, the issue is clearly with the device and not the router.
Not being able to connect with the second device doesn’t necessarily mean that the router is the problem. If you’re having trouble with a specific website, try accessing it using mobile data. But if you still can’t access the site, the issue is on the site’s end.
Disconnect from VPN
If you use a Virtual Private Network (VPN), make sure that it’s disconnected before you try to access the website that gives you the DNS error message. It’s because VPNs added a new layer to networking that might cause issues when misconfigured or when it’s not running correctly. It’s important to disconnect from your VPN before performing any fixes.
Run Windows Network Diagnostics
On Microsoft Windows PCs, Windows Network Diagnostics can be run to help diagnose internet connection problems. If you’re not sure whether or not your computer is reporting DNS Server Not Responding errors, follow these steps:
For Windows 10:
- Type ‘Control Panel’ from the Search bar
- Select ‘Network and Internet’

- Select ‘Network and Sharing Center’
- Click ‘Troubleshoot’

- Select ‘Ethernet’ and click Next.

- Once the troubleshooting test finishes, it will display the error messages on the Problems found section
For Windows 7:
- Open the Control Panel.
- Go to the Network and Sharing Center.

3. Click the Troubleshoot problems under Change your Networking Settings.

4. Then click Internet Connections. A new Internet Connections window appears. Click Next.


Wait for the troubleshooting tests to complete and look in the Problems found section of the window for the error message.
Solutions:
1. Use a different browser
One of the quickest steps you can try to fix DNS server not responding issue is by accessing the website using a different browser. If your default web browser is Chrome, you can simply switch to Firefox or Opera to see whether it fixes the issue.
If it does, update your default web browser to the latest version or uninstall and reinstall it. However, if the “DNS server is not responding” message still appears, you can proceed to the next step.
2. Restart your modem and router
Simply shutdown your computer, modem+router, then restart them all and try connecting.
This will clear your router’s cache and thus it may resolve DNS errors.
Unplug your modem’s power cable as well as your router’s power cable. Then, allow both your modem and your router to sit for at least 30 seconds. Next, reconnect your modem and wait for it to come back online. Lastly, reconnect your router to your modem and wait for it to come back online.
3. Change the DNS server addresses
The DNS server address is usually obtained automatically, but you can set it to something more reliable. As the DNS server your PC obtained automatically is not responding, you can change it to one of the most reliable DNS servers out there.
For Windows 10:
Type in ncpa.cpl into the Windows search box and press Enter. Or you can also press on the Windows key from your keyboard and start typing which will take you to the search box.

a. Choose the current internet connection you are using, right click on it and select Properties
b. This will prompt a new window. Scroll down and select Internet Protocol Version 4 (TCP/IPv4), then click Properties button

c. From the new window that appears, select “Use the following DNS addresses”

d. Type in the desired DNS address in the Preferred DNS server and Alternate DNS server fields > tick the Validate settings upon exit field > Click OK. Restart your Windows afterwards.
e. Try to connect to the internet again. Open a web browser to access the websites you were getting problems to see whether DNS server not responding error has been fixed.
For Windows 7:
Click on the Windows Key type in Run in the search bot and then type ncpa.cpl in the Run box and press Enter.
a. You will see the network connections. Right click on the connection that you are using and click on Properties.
b. A new window will pop up. Select Internet Protocol Version 4 (TCP/IPv4) and then click Properties again.
c. In that window select the button that says Use the following DNS server Addresses.

d. Then, in the Preferred DNS Server field and the Alternate DNS Server field type the desired DNS. Next, check the Validate Settings Upon Exit box and click OK. Now restart your PC.
e. Try to connect to your internet and browse the websites that you were getting errors to see if the problem is solved. If it didn’t work, then try out the next method.
4. Flush the DNS cache of your computer
If the above steps don’t work, you might want to take a look into your DNS settings and flush the DNS cache of your computer. Follow the step by step below to perform this:
a. Click the Start button, run Command Prompt by typing in cmd in the search box and press Enter from keyboard.
b. When Command Prompt appears, type in ipconfig /flushdns and hit Enter. This will remove all the DNS cache entry which just might resolve the problem.
” alt=”Type ipconfig flushdns and hit Enter to flush DNS cache” />
c. Once done, restart your computer and check if the DNS server not responding problem still exists. Check out this link to read more about how to flush your DNS cache.
5. Change physical address
a. Go to Windows Start menu, run Command Prompt by typing in cmd in the search box and hit Enter.
b. In command prompt type in ipconfig /all and press Enter. Find the physical address and write it down.

c. Go to the start menu again, type in ncpa.cpl in the search box and hit Enter. This will show you the network connections.
d. Now right click on the active connection that you are using and select Properties.
e. Click on Configure and then select Advanced tab.

f. After that, click on Network address and select the button that says Value.

g. Now type in the network address that you have written down previously. Make sure you write them without dashes. Then click Ok and restart the computer.
6. Correct your DNS server address
For Windows 10:
- Type ‘Control panel’ into the search box and select the menu
- Select Network and Internet
- Select Network and Sharing Center

- From the menu on the left sidebar, click ‘Change adapter settings’
- Right-click on Local Area Connection, Ethernet or Wi-Fi according to your Windows. Then click ‘Properties’
- Click Internet Protocol Version 4(TCP/IPv4), then click Properties

- Check ‘the Obtain an IP address automatically’ and ‘Obtain DNS server address automatically’ boxes. Then click OK.

- Repeat the above steps for IPv6
- Try to access the website again to see whether DNS server not responding issue has been solved
For Windows 7:
a. Go to control panel and click Network and Sharing Center.

b. Next click Change adapter settings.

c. Right-click on Local Area Connection, Ethernet or Wi-Fi according to your Windows. Then click Properties.
d. Click Internet Protocol Version 4(TCP/IPv4), then Properties.
e. Check the Obtain an IP address automatically and Obtain DNS server address automatically boxes. Then click OK.

Do the same for Internet Protocol Version 6(TCP/IPv6).
f. Try to access the website you want to go again and see if it succeeds.
7. Update your network adapter driver
You need to head to the device manager window and scroll down to the section of network adapters. Right-click on the active network adapter and click on “Update Driver“.

If there’s an update available, you should apply it.
After updating your network adapter driver, please restart your computer. Try to access the website you want to go again and see if it succeeds.
8. Upgrade to the latest firmware on your router
Important note: Upgrade failure might cause permanent damage to the router.
It is always recommended to have the latest firmware or software updates applied. However, if you are not sure that this is the issue, we would not recommend you to proceed.
Instead, reach out to an IT expert to upgrade your router’s firmware without confusion. If it’s an issue with the firmware, you should no longer encounter the error after applying the update.
9. Disable antivirus software and firewall temporarily
Although antivirus programs are designed to keep intruders out, they also have the capability to block internet access if they detect a misbehaving device.
Most antivirus programs work using special database (dat) files that the software vendors automatically update on a regular basis. Unfortunately, sometimes mistakes are made with these dat updates that cause the antivirus program to believe a computer is infected when really it is a false alarm.
These false positives can trigger Windows to suddenly start reporting DNS Server Not Responding errors.
To verify whether this is the cause for your device, temporarily disable the antivirus program. Next, re-run the Windows Network Diagnostics. Consult the antivirus vendor for either a new update or technical support.
Disabling your antivirus does not work as a permanent solution, but it works fine in order to temporarily troubleshoot the problem.
10. Disable secondary network connections
Another step that you can try to solve DNS server not responding error is by disabling the secondary connections in your computer and using only the currently active connection.
Here’s how:
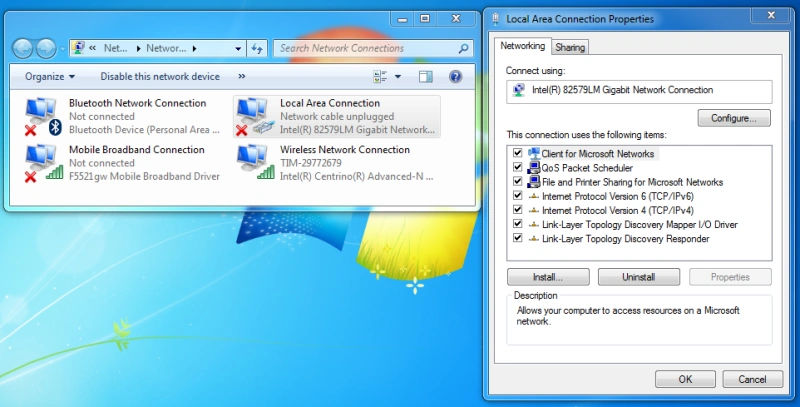
- Type ‘View network connections’ into the search box and click View network connection option
- A new Network connections window will appear. This is where you can see all of the network connections you have; the ones that aren’t in use will have red ‘X’ marks on them.
- Hover on the network connection that you don’t use > right click and click ‘Disable’

- Repeat the above step for all network connections not in use
- Restart your browser and revisit the website again
11. Disable Internet Protocol Version 6 (IPv6)
Internet Protocol Version 6 is the latest version of Internet Protocol that routes traffic between networks and the Internet. Sadly, it’s also one of the possible culprits of ‘DNS Server not responding’ error, so you can try to disable it to solve the issue.
Here’s the step by step to do this:
- Type ‘View network connections’ into the search box and click View network connection option
- A new Network connections window will appear. Right click on your current active connection and select ‘Properties’
- A new tab will open. Select ‘Networking’ tab and scroll down until you find ‘Internet Protocol Version 6 (TCP/IPv6)’

- Untick the box if it has been selected, then click OK
- Restart your browser and revisit the website again
12. Disable Peer-to-Peer Feature
The Peer-to-Peer (P2P) feature allows you to download Windows update once, then use the device to share the updates across all the PCs in your local network. This feature can only be found on Windows 10.
The P2P feature can sometimes interrupt the DNS processes, and you might want to disable it to see whether this will solve the issue. Follow these steps to disable the P2P feature:
- Type ‘Settings’ in the search box and select the Settings menu
- Select ‘Update & Security’

- A new window will appear. Select ‘Delivery Optimization’ from the left sidebar menu
- Switch the toggle off under ‘Allow downloads from other PCs’

- Restart your computer and revisit the website
Next Step
We hope this article helps you solve the DNS server not responding errors. If you find a suggestion that we haven’t listed, feel free to add it in the comment section. Please also consider sharing this article if you find this useful.
For more useful tips in fixing issues on your PCs, please feel free to follow our blog.
For simple and effective PC maintenance, try jv16 PowerTools – the professional choice for over 20 years. Sign up for a 14-day free trial and have your computer running like new today!