


The developer of RegCleaner, jv16 PowerTools, Uninstalr, WinFindr, Startup Timer, ScreenshotX, System Examiner and Windows Update Fixer.
A couple of words on DNS
DNS stands for Domain Name System. It translates website names into IP addresses which computers can understand. This happens for every website you want to visit. Every time a user visits a website by its hostname, the web browser initiates a request out to the internet, but this request cannot be completed until the site’s name is “converted” into an IP address.
Windows comes with an option which stores the specified DNS server address to speed up browsing experience. It makes the TCP/IP stack use that IP address and refers to this user-specified DNS service or gateway-specified service to resolve the domain name of a website to its IP address and load it in your web browser.
In most cases, your Internet Service Provider (ISP) provides their own DNS server. This server is usually specified in your router or automatically fetched from the ISP. The internet relies on the DNS to maintain an index of all public websites and their corresponding IP addresses.
In some cases, you may want to switch to an external DNS server. Some reasons include:
- it may update its cache faster,
- a third-party DNS service can have a built-in ad blocker,
- other DNS services can provide extra security
What is the DNS Cache?
Even though there are tons of public DNS servers your network can use to try to speed up the conversion process, it’s still quicker to have a local copy, which is where DNS comes in.
Whenever you visit a website using it’s domain name, your browser is directed to a DNS server where it learns the IP address of that website. Then, you are directed to that website.
The primary function is storing the location of web servers that contain web pages which you have recently accessed. If the location of any web server changes before the entry in your DNS Cache updates, then you can no longer access that site.
A record of the IP address is created within Windows so if you visit that same website again, the information is accessed quicker. These records make up the DNS Cache (sometimes called a DNS resolver cache).
How flushing the DNS Cache can help you
If you can’t access a web page in spite of the page existing on the internet it indicates DNS Cache on the local server may be corrupted or broken.
Sometimes bad results are cached, maybe due to DNS Cache Poisoning and Spoofing. Therefore they need to be cleared from the cache in order to allow your PC to communicate with the host correctly.
Or sometimes an IP address to a site may change. If the DNS Cache has the old IP address record, it may result in your computer not being able to reach the site. Therefore, clearing it is a step you can take whenever you cannot connect to a site.
How to see your current DNS Cache
To see your current Windows DNS Cache, open a new elevated command prompt instance and type the following command:
ipconfig /displaydns

The command will produce a very long output.

For your convenience, you can redirect it to a file. Use the following command:
ipconfig /displaydns >%USERPROFILE%\Desktop\dns.txt 
Then you can open the dns.txt file created on your Desktop and inspect its entries.

Flush DNS Cache, Option 1 – Windows Command
- Hold down the Windows key and press “R” to bring up the Run dialog box.
- Type ipconfig /flushdns then press “Enter“.
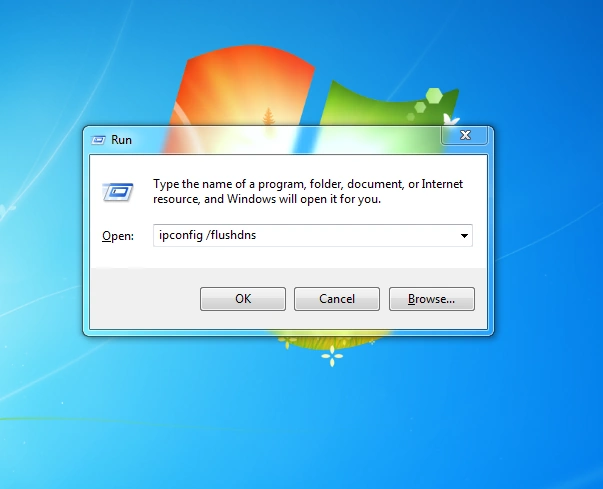
A command box will flash on the screen and the DNS Resolver cache is cleared.
Flush DNS Cache, Option 2 – Windows PowerShell
- Select the “Start” button, then type “powershell“.
- Select “Windows PowerShell“.
- Type Clear-DnsClientCache, then press “Enter“.

Flush DNS Cache, Option 3 – Command prompt
- Click on start menu search and type ‘command’.
- From search results right click on Command Prompt (make sure you’re running it as administrator).
- Type ipconfig /flushdns and hit enter.

Conclusion
When you flush DNS Cache, it removes all the entries and deletes any invalid records. Thus forcing your computer to repopulate those addresses the next time you try accessing those websites. These new addresses are taken from the DNS server your network is set up to use.
A router can have a DNS cache as well. Which is why rebooting a router is often a troubleshooting step. For the same reason you might flush DNS cache on your computer, you can reboot your router to clear the DNS entries stored in its temporary memory.
Check out this article to find out the current best DNS Servers which you can use for free!